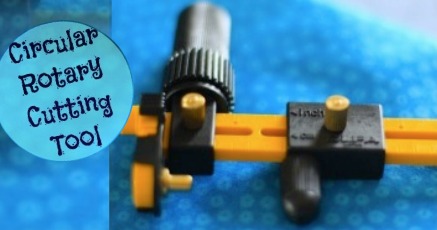
Today’s special guest has opened my eyes to a tool that I did not even know I needed!! That’s right, this circular rotary cutter puts a whole new spin on my rotary wheel!
Circular Rotary Cutter- Who knew they made one?
Hey Sewing Loft fans!

I’m going to share a fun and quick Pillow Case Tutorial using my favorite tool, the Circular Rotary Cutting tool. This puppy is so handy to have if you cut a lot of circles!! It cuts perfect circles and can handle multiple layers easily! No more sitting there with your scissors trying to cut the perfect circle shape!!
We’re going to make a creative applique of colorful flowers and will utilize the free motion stitch on the sewing machine!!
Ready?
You’ll need:
Circular Rotary Cutting Tool
Rotary Cutting Tool
Long ruler
Various fabric scraps for circles and leaves
Sewing machine
Free Motion machine foot
Colorful thread (or white)
Fabric rectangles for main pillow case (38″ wide X 28″ long)
Fabric rectangles for ends {different color} (8″ wide X 19″ long)
Buttons (optional)
Start:
Cut main pillow case fabric. Fold the fabric in half (long ways). Measure and cut using your rotary cutter and long ruler to ensure a straight cut. So, your measurement would be 19″ X 28″ (as the fabric is folded in half remember)
It takes me a bit to decide color combos, I’m sure I’m not alone. So, I like to ‘audition’ fabric to see how they look. To do this, I fold the fabric about the width I’ll be using and set it along the other fabric. I auditioned about 5 or 9 fabrics before I decided on this beauty combo…
Once you’ve chosen you fabric, cut the smaller pillow case fabric for ends.
Cut the end fabric 8″ X 28″.
Fold the end fabric in half long ways with WRONG sides together and press.
This will give you the measurement of 4″ X 28″.
Open the large fabric. Put right sides of each fabric together, pin, and sew the end on. You can use a straight stitch and use a zig zag to finish the edges if you wish (or serge it if you have a serger).
Press to give you a nice flat seam
Tip: Press a crease where the fold will be to help you know where center is while you’re placing your flowers.
Moving on to the embellishing …
{Open your case so you don’t pin the circles and leaves to BOTH the front and back of the case.}
Cut various sizes and colors of circles using the circular rotary cutter. BE CAREFUL! This little tool can cut you and poke you! So please use caution while using it.
Use the regular rotary cutting tool to cut random sizes of leaves. Up to you how many you want and the sizes you’d like.
Lay a large circle down first and proceed to layer with smaller and smaller circles to make a flower. Make it YOURS!!! It doesn’t have to be perfect. Place the circles randomly to make an imperfect flower (if you wish). Pin them.
Take your leaves and place them slightly under the edge of the largest circle and pin it.
Use your free motion foot and be sure to drop the feed dogs! I made circles going around and around for the flowers. For the leaves, I got playful and creative and made squiggly stitches, swirlies, and viney appearing lines.
I used buttons for the center of the flowers, however, you can totally use another small circle.
Stitch the button on.

This will give you a pillow case!!!
And here is the finished product…

I can’t wait to use it tonight!!! It will certainly be MY pillow … (my house is full of boys!)
Thanks, Heather, for having me share in The Sewing Loft’s National Sewing Series!!
***Please don’t be a stranger over at taradaramadeit.com as I’d love to get to know you as well …
psstt …. I’m off to the Emmy’s and will be posting video and pictures while I’m there!
I’d love to connect with you on Pinterest, Facebook, or on Twitter … oh, and don’t forget Instagram!
Isn’t great how Tara infuses crazy fun into her projects!! Did you catch that she will have some Emmy news? I can wait to see a few pictures!
I sure hope you are enjoying learning about different tools and fun projects during National Sewing Month. Be sure to stop by and visit some of these amazing guests. They would love for you to say hello!!
Michelle from Sew Michelle sharing one of her favorite tools and super cute project!


Comments & Reviews
I love this!! But it must be a Rorschach test for crafty people… I saw an owl instead of flowers… How cute is that?!
The first thing I saw was owls, too.
Micki, LOL! I saw that too after I completely assembled it … but I thought it would be cute to leave as is. It kind of ties in to Heather’s backpack pattern she just released! Totally fun! xo Tara
where do you find this circular rotary cutting tool? I’ve Googled and don’t see anything advertising this.
Fantastic toolDid not know about it .
I have that tool and love it. Thanks for sharing
where did you find it ???
I found several of them on line. They are made by Olfa. Here is a direct link to the brand page. http://www.olfa.com/CircleCutters.aspx
~Heather
I have a circle cutter and love it though I know I don’t utilize it enough. Thanks for a great way to put it to good use.
I bought my tool at a quilt festival. You can also find them at Joann (and use your handy 40% off coupon!!)
thanks for the wonderful tutorial 🙂
Loooove your Owl!! Funny I only saw Owl too..not flowers! giggle…Thanks for info on this circle cutter & all…looked so intimidating in store!! Would love to try now! 🙂