Half square triangles are a quilt shape with a fairly transparent name: they’re triangles that are made from half a square each.
There are several ways to make half-square triangles (commonly abbreviated HSTs in the quilting world), and every quilter tends to find her own preference for making them. Do you have a favorite method for making HSTs? If not, follow along with us as we go through them! For each of these steps, you will need two pieces of fabric, a rotary cutter and mat, a marking pen or chalk, and a sewing machine.
Half Square Triangles
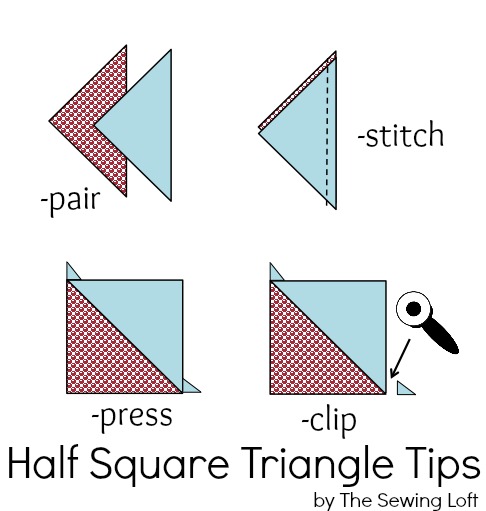
HST Option 1: 1 pair at a time
– Cut a square out of Fabric A and another out of Fabric B, making them the same size.
– Using your ruler, measure the straight-line diagonal across the first square. Cut along this line from corner to corner, separating the square into two triangles. Repeat with the second square.
– Line up a triangle from Fabric A with a triangle from Fabric B, with right sides facing. Sew a scant ¼” seam* along the diagonal edge to connect the two triangles.
– Gently press** the seam open and trim the newly-sewn square to a uniform size.
*Tip: A scant ¼” seam allowance is a seam that is just slightly smaller than ¼” in width (the standard quilting seam allowance). This is important to make sure that the sides of your finished, seam square line up correctly once they have been sewn and trimmed. Mastering the scant ¼” seam is essential to successful HST piecing.
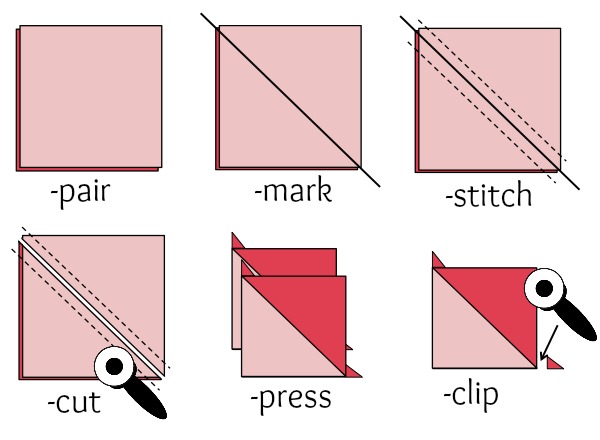
HST Option 2: 2 pairs at a time
– Cut a square out of Fabric A and another out of Fabric B, making them the same size.
– Position the two squares together with right sides facing, lining up the edges.
– Use your quilting ruler and a marking pen to draw a straight line along the diagonal across the squares.
– Use your sewing machine to sew a scant ¼” seam on either side of the line you just drew.
– Cut along the line with your rotary cutter or scissors to separate the HSTs.
– Gently press the seam open and trim the newly-sewn square to a uniform size.
**Tip: Press the HSTs once they are sewn into squares, do not iron them. Ironing will warp the bias direction of the fabric and distort the finished shape. (For a detailed explanation on the differences between pressing and ironing, see this post!)
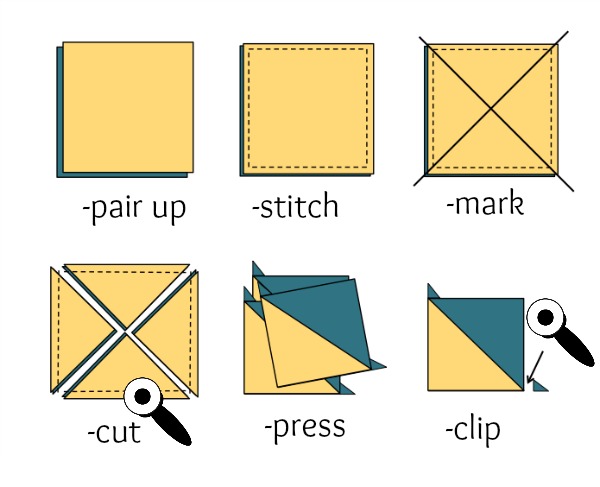
HST Option 3: 4 pairs at a time
– Cut a square out of Fabric A and another out of Fabric B, making them the same size.
– Position the two pieces of fabric together with right sides facing, and sew a scant ¼” seam all around the perimeter of the blocks, pivoting at each corner. (Yes, we realize this means the squares will be entirely sewn together and you won’t be able to see the fabric right sides any more!)
– Use your rotary cutter and cutting mat to cut a straight diagonal across the squares, separating them into two triangles.
– Cut across the opposite diagonal; now you have four sets of triangles.
– Gently press open your seams and trim the finished blocks.
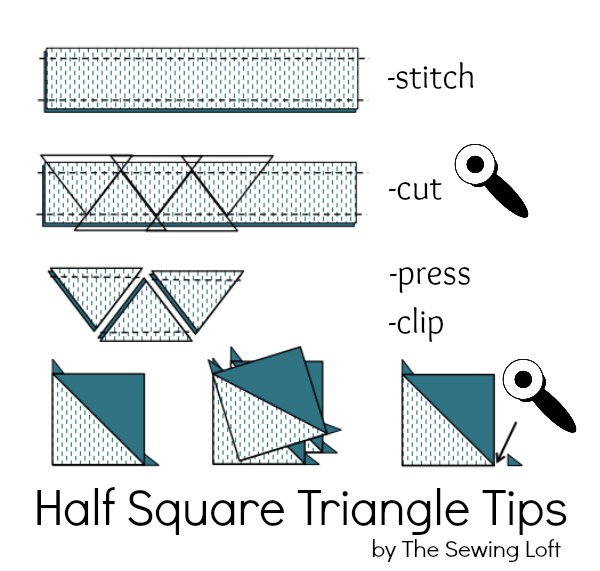
HST Option 4: Jelly Roll
– Position two jelly roll strips together with right sides facing, lining up the edges.
– Sew a scant ¼” seam along the long edge of the rectangle. Repeat along the other side.
– Use your rotary cutter, cutting mat, and square ruler to cut triangles along the strip. This will produce many half square triangles. The amount depends on just how much of the roll you want to use. If you use the full width (42″ cuttable) you will have 12 half square triangles when finished.
– Gently press open your seams and trim the finished blocks.
The Half-Square Triangle is a key shape involved in the creation of several quilting blocks, so you’ll see this one come up again in future posts in this series! Until then, go ahead and practice with some of your scraps. It’s best to use one light and one dark fabric for the best contrast as you create your HSTs. Once you’ve sewn a few, play around with patterns and directions until you put them into a pleasing arrangement!
Bonus Tip for Half Square Triangles-
You can cut HST’s quickly and accurately with this special ruler. See how easy it is to use!
Do you have a favorite method of making half square triangles, or a tip to share with us? Leave it in the comments below!
Hello! Are you new to The Sewing Loft?
If so, I’m glad you stopped by and hope that something has inspired you to keep your needle moving! Don’t miss a single project and subscribe via email HERE! Bonus- free download with newsletter sign up.
Another great way to connect with me is via Facebook, Pinterest, Twitter, or Follow along with Bloglovin. I’m looking forward to getting to know you and creating together!


Comments & Reviews
How do I work out the finished size of the squares made from the 3 methods please?
I make my HST two at a time by sewing two squares together 1/4 inch from the diagonal. Before pressing them open, I square them up and trim them to size with the Quilt in a Day square up ruler. They are perfectly square, and the exact same size once they are pressed. Even if my 1/4 seam is slightly off, all HST units will be exactly the same size once I trim them up. I also don’t have to worry about bias stretch.
Would option #4 give you a 2″ HST?
how can i subscribe to your facebook page?
Just hit the like button on our Facebook page Pat and you should start to see the posts in your feed. I’m always sharing tons of good stuff over there.
~Heather
You forgot to mention in option three that your HST’s will have all bias edges.
Is there a chart that I can use to get the correct size host?
I wish I had a formula as to the correct measurement in making the triangles. Love the last idea…never saw that one before.
Using the papers, like thangles is also. a good way to make HST’s
this is really helpful, thank you so mucy
I’ve spent the last year learning to do the most basic of basic quilts..think I’m ready to move on up to the HST now! This is great, thank you!