Keepin’ It Super Simple!
Today’s post is all about friendship. A simple act of kindness, a bond between two people.
Last year, I had the pleasure of connecting with TJ from Studio Mailbox and am honored to call her my friend! I just loved her point of view, outlook on art and her outgoing personality.
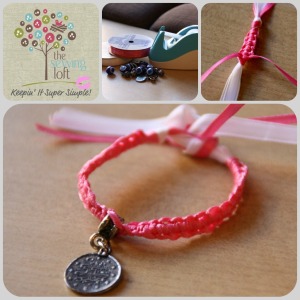
Today, TJ shares an easy “how to” for a friendship bracelet.
This project is for all levels.
Skill Level- 1 Button
Materials:
- tape
- ribbons/yarn/cording
- beads/charms/buttons for embellishing
- Cut 4 pieces of 2-foot ribbon. (I used two different colors, for photo purposes).
- Tie them together, leaving about 4″ of ends (later you tie the bracelet onto your wrist with the ends… you don’t want them to be too short)! Tape your ribbons down to your working surface.
- Separate the four ribbons, take the two in the center and anchor them down at the bottom of your work surface. You will make alternating knots with the two loose ribbons around the ones that are secured to the table.
- Starting with the left ribbon, cross it over the top of the center ones. (It looks like the number 4 at this point). Slip the end UNDER the ribbons that are anchored and gently pull until the knot snugs up to the top.
- Now take the loose ribbon on the right side and lay it over the top of center one. (It looks like a backwards 4 at this point). Slip its end UNDER the anchored ribbons and snug it up next to your first knot.
- Continue alternately making these knots, working your way down the anchored ribbons. If you want your bracelet embellished, you can add beads, charms or buttons to them by removing the tape of the anchored center ribbons. Thread a bead or charm up those center ribbons, then re-secure it to your work surface.
- Continue your macrame half knots right around the embellishment.
- Work your way down to your desired length and tie off the ribbons with a knot. Trim ribbons at about 4″ so you have enough ribbon left over to secure it to your wrist!
Hello! Are you new to The Sewing Loft?
If so, I’m glad you stopped by and hope that something has inspired you to keep your needle moving! Don’t miss a single project and subscribe via email HERE! Bonus- free embroidery pattern with sign up.
Another great way to connect with me is via Facebook, Pinterest, Twitter and Google +. I’m looking forward to getting to know you and creating together!


Comments & Reviews
Wow Heather, you compiled the steps so beautifully in your photo collage. I feel famous hanging out at the sewing loft!
I hope a lot of your readers and their kids made some! Thanks for sharing the macrame love!!
Proud to be your friend,
xx tj
You are so sweet. I just love the way the project turned out.
What a sweet little bracelet!! A few blog friends and I are hosting our first link party tomorrow to finish off the Imagine the Impossibilities Challenge, we go live at 7amET. Today I revealed my project for the challenge, a gallery wall with only one screw in the wall. It would be great if you have a chance to check it out and link up! http://thespacebetweenblog.wordpress.com/2012/01/30/the-one-screw-gallery-wall-is-here/
Karah @ thespacebetweenblog = your newest follower
what a great tutorial – this shall be made!
Great tutorial! So simple and so cute. My daughter loves making and wearing friendship bracelets. I’m looking forward to sharing this one with her!
Wonderful!
ps- I stopped by your shop and LOVE your little guys…
Thanks so much!
Very cute – I love the look of the wrapped ribbon, with the ribbon coming out at the end! This kiss series of yours has been VERY good!!
Thanks for linking up again on the Take it on Tuesday blog hop! I look forward to seeing more from you, always!
THis is so pretty 🙂
Love for you to share this at JAQS Studio Linky Party:
http://www.jaqsstudio.com/2012/01/made-by-me-16-linky-party-and-features.html
So glad you like it!
What a sweet friendship bracelet! Thank you for sharing the tutorial!
Super sweet bracelet, I want to try and make one. I would love for you to link this up to my Valentine contest for a chance to win.
so fun thanks for sharing this at my What We Wore and Made party
First of all… I love how you rank your projects with Buttons!! Genius!!
Second… I LOVE IT!!!
Check out my blog too 🙂 I also have a linky party going on.. I would love it if you shared your creation.
thediydreamer.blogspot.com
Just like summer camp! But pretty :0)
Thanks so much for taking the time to share at Pin’Inspiration Thursday. Hope to see you on Saturday to help “Beat the Winter Blues”. Have an awesome day.
Your right, just like summer camp. This one is going into my bag of tricks for the summer. I keep a craft bag for when my girls get bored.
What a great tutorial! I love the pictures and how simple it seems! Thanks for sharing!
gorgeous!! simply gorgeous!
So sweet and simple! Love it! Thank you so much for sharing at Taking A Timeout Thursday!