Keepin’ It Super Simple!
I love the soft feel of a soft cozie sweater but what do you do when you outgrow it? Or you spill grape juice on it?
Well, I like to ReClaim them and turn them into softies.
This project is for sewers all levels.
Skill Level- 1 Button
Materials:
- Sweater
- Tee Shirt
- Felt
- Double sided fusible
- Poly fil
Tools:
- Sewing Machine
- Needle and Thread
**Since I know that many of you like to print out a hard copy of the article to use as a reference while sewing, I have created an optional PDF that’s optimized for printing and ad-free. Find more here. The blog post and video are totally free to read, print, and sew! The PDF tutorial & download for $2 is totally optional.
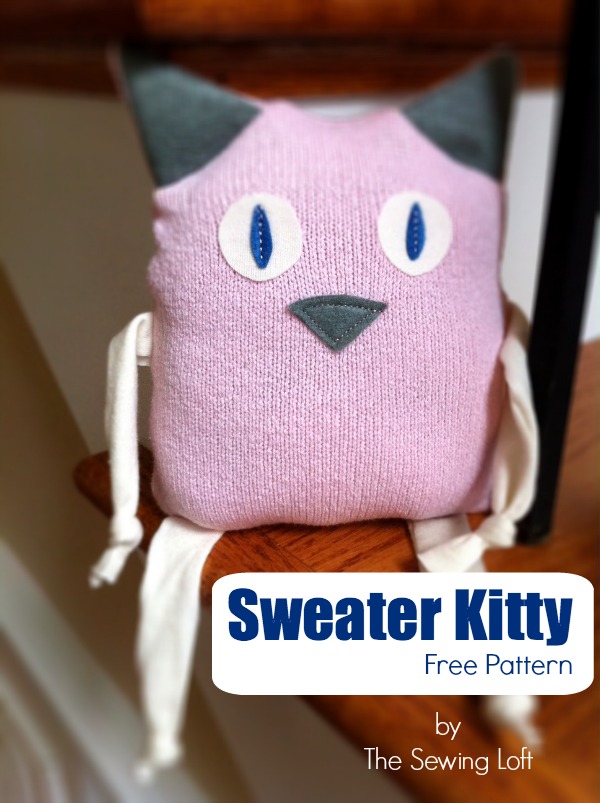
- From sweater; cut 2 bodies & 2 ears. From felt; cut two ears, 1 nose from felt & 2 inner eyes. From tee-shirt; cut 4 strips 6″ long x 2 1/2″ wide. These strips will be the arms and legs.
- The eyes and nose will be created from a fabric applique. Click here for the “how to” post. Iron eyes and nose to body. I added all around straight stitch to nose and stitched down the center of the inner eye.
- Match the ears, wrong sides together and stitch all around; clip; turn ears out and lightly press. Be sure to pull out the points of ears with a pin if needed.
- To create arms and legs; fold your tee-shirt strips in half, then tie a knot close to the end.
- To join pieces; pin the ears at the top, arms at the side marking and legs 1/2″ in from corners along bottom edge. Be sure that all parts are on the body and not extending past. Sandwich right sides together with the back side of body. Pin everything in place. *I reduced the arm length 1″ on my Kitty.
- Bring to your machine; starting at the bottom edge, straight stitch all around to the other side. Be sure to leave around 2″ open along the bottom edge.
- Turn the Kitty right side out and lightly press.
- Stuff Kitty with poly fill.
- Pin opening together and slip stitch closed with needle and thread.

Remember, Keep It Super Simple!!


Comments & Reviews
Gosh!! You’re really great with tutorials!!!
I hope you share this with my readers!!
Cute little Kitty – and another great tutorial!
Thanks for linking to a Round Tuit!
Hope you have a fabulous week!
Jill @ Creating my way to Success
http://www.jembellish.blogspot.com/
This is adorable! I will have to make this with my daughter. When I do, I’ll be sure to share it with you.
OOOHH Kim, please do. I just love to see photos in my inbox.
~Heather
So love your softies, How cute is that, and what a great way to use an old sweater. You also put together some really great tutorials. Love the “limbs” on the sweater Kittie, and the eyes get you right away. Thanks for sharing your creative inspiration at Sunday’s Best.
That looks great!
Love the sweater kitty!
Your little kitty is adorable! My little girl would love one! Thank you for sharing! 🙂
Love your kitty. We have been sick this week, so I have not been sewing but singing Soft Kitty.
LOVELY! You make it seem so easy – I might even try it someday 🙂
It really is easy. I promise! Give it a go and let me know how you make out!
i love all of your smart,creative ideas Thanks for joining the BeColorful party.
Pam
Hey 🙂 I was just trolling around craft blogs and stumbled onto your cool idea. I was actually just cleaning out some of the hubby`s old clothes and while I have used the material in the past for different projects, this is a new, adorable idea 😀 I`ll have to give it a shot, cheers!
– Erika, Cat Dead, Details Later
Hello Erika,
Yay, you found me! It is super easy to make and really 0 cost. Drop me a line or a photo if you make it. I would love to see.
~Heather
Great idea, very cute, love it!!!!
So adorable! You make the cutest things!! Thanks for sharing this!
I am so glad you like my projects!
This is super cute! Thanks for sharing at A Pinteresting Party this week. I’m thinking I can do this…just have to get a sewing machine first…or head on over to my moms with the materials!
How cute! 🙂 I recently made a whole party’s worth of monsters out of sweaters for my boy who turned 5. They had addoption certificates and everything! This would be great for my daughter!! 🙂
Blessings
Val
http://pinterest.com/pin/47498971039666196/
Love the idea of adoption certificates! Thanks so much for sharing.
~Heather
Ahhh, how sweet! Thanks for the simple tutorial, glad I found you at Friday Fun Party.
I LOVE this.. So pretty and very easy.. Thanks so much for sharing the lovely tutorial.. I am featuring you tonight via Pin’Inspirational Thursdays.. Hope you can stop in and snag a fun button / link up again.. Wishing you a beautiful day.. xoxo~! Marilyn
Hey
i am having trouble peeling the fusible backing from the felt. I used knit t-shirt for the inner eyes and it peeled great. What am i doing wrong?
Hello Tracy,
One thing that I can think of is your iron setting. It is VERY important to use a low heat when bonding fusible. When the iron is too hot it melts all of the “glue” and then nothing peels away. Give it another go and let me know how you make out!
Yay!! got it. Thanx so much. I’ll post a pic when i’m done.