During a recent “What are you working on’s”, Allison shared this amazing Rockabilly headband and so many of you wanted to learn more! So, I asked Allison to join us today and share her process.
Rockabilly Headband Tutorial
This project is for all levels.
Skill Level- 1 Button
Supplies:
- Fabric
- Wire
- Electrical Tape
*Note: A wire coat hanger can be used, although Allison prefers a thinner wire from her local hardware store.
Tools:
- Sewing machine
- Knitting needle or chopstick
- Basic sewing supplies
Basic Instructions:
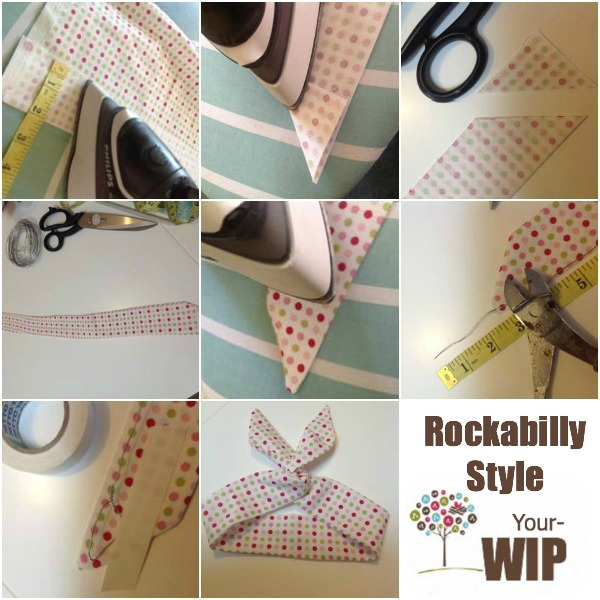
- Cut a piece of fabric measuring 32″ x 4″. Fold in half to create a 32″ x 2″ rectangle, right sides facing; iron along fold.
- Fold end over to create a point, press and cut along fold line.
- Sew along fabric from end to end, leaving a gap in the middle for inserting wire. (I left 2 1/2″ for easy turning and clipped corners to reduce bulk.)
- Turn headband right side out, and gently use knitting needle to push corners out. Press.
- Cut wire 5″ longer fabric at point. Twist each end to create a loop and secure in place with electrical tape.
- Slip wire in place, and sew opening closed.
Since Lady A likes to wear her hair in a high bun we made our headband smaller. We cut our fabric 16″ x 4″. This is long enough to wrap around your bun once and twist like the main picture. This project is extremely easy to make and a great way to use up scraps. The smaller size that we made is perfectly sized for fat quarters.
A big THANK YOU to Allison Coulson for sharing her Rockabilly headband tutorial with us. I created the headband featured for Lady A in just a few minutes.
ps- The fabric is direct from my stash and was made in Anna Maria Horner’s True Colors Collection.
Hello! Are you new to The Sewing Loft?
If so, I’m glad you stopped by and hope that something has inspired you to keep your needle moving! Don’t miss a single project and subscribe via email HERE! Bonus- free embroidery pattern with newsletter sign up. Another great way to connect with me is via Facebook, Pinterest, Twitter, Google + or Follow my blog with Bloglovin. I’m looking forward to getting to know you and creating together!


Comments & Reviews
Too cute, will be making some this afternoon with my granddaughter, she will love this………
My daughter just rummaged through my stash and asked for 3 more of the shorty’s. Looks like I’ll be stitching this afternoon while the snow is falling outside.
~Heather
This is so awesome!!! I’ve linked to your tutorial on Craft Gossip: http://sewing.craftgossip.com/tutorial-rockabilly-headband/2014/02/14/
—Anne
Thanks a bunch Anne! Allison of member of The Sewing Loft community shared it and my daughter is in love. She made them all day yesterday during the snow storm.
~Heather
Cute idea. Question is the wire 5″ longer than the tie? Think that’s what you meant
Yes, Peggy. The wire should be 5″ longer than your tie. Thanks for letting me know. I will update and correct.
~Heather
I cant wait to make these. I have everything I need at home so this tutorial will save me a lot of money. I love wearring these so I see making many in my near future.