Many of us share a work surface to sew on. It could be the dining room table, a small desk or even the kitchen counter. (don’t judge, I’ve done it!)
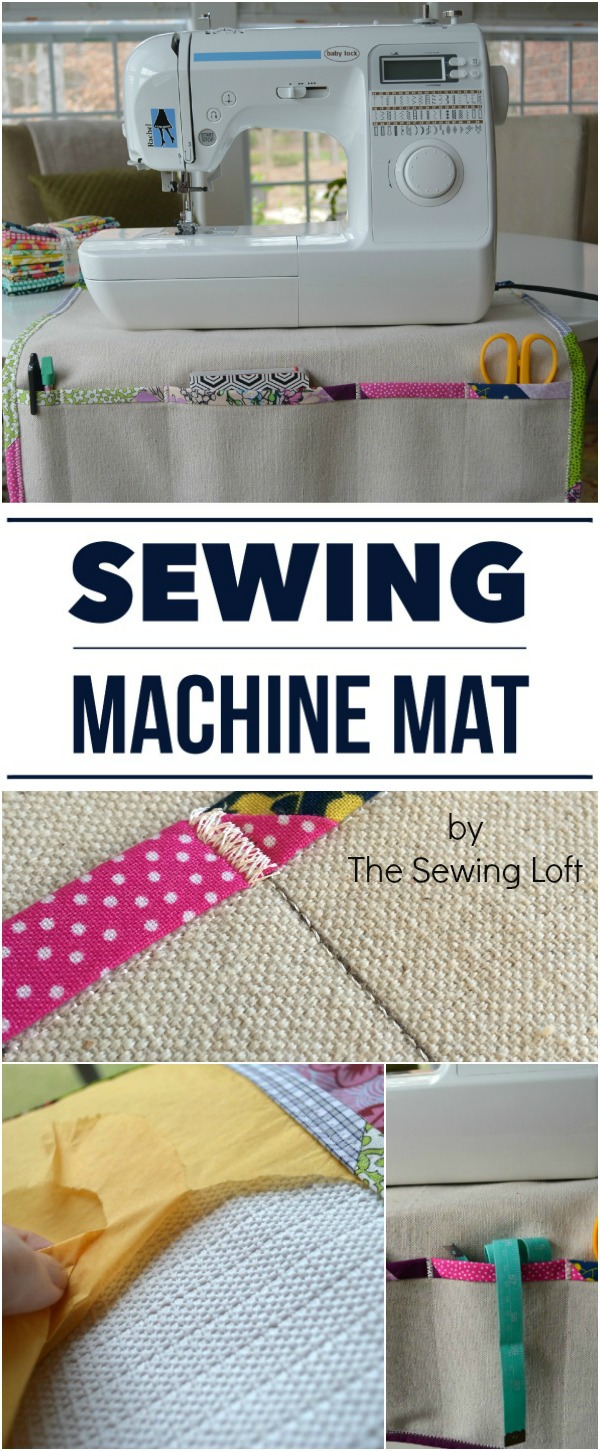
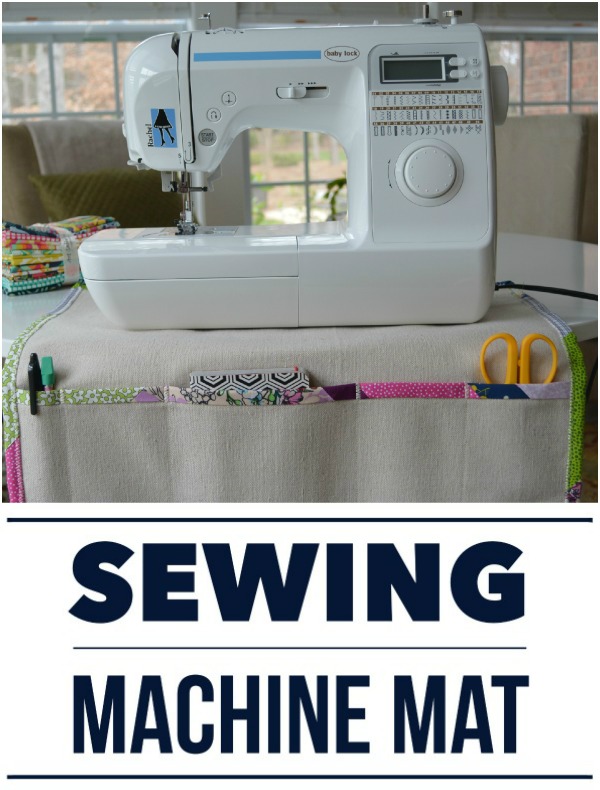
I’ve tried a bunch of different things to prevent scratching the surface, including a bath towel. This helped prevent scratching but not reduce the noise or the shaking. To help solve my issue, bust through my scrap bucket and stitch something pretty, I made a sewing machine mat. Actually, you could also call it a sewing machine organizer since it has a few pockets to hold goodies that I tend to leave in the other room when cutting.
Sewing Machine Mat
This project is for all levels.
Skill Level- 1 Button
Some of the materials are completely unconventional but trust me, they make all the difference!
Supplies:
- Shelf gripper paper
- Canvas or painter’s drop cloth
- Tissue paper
- 100″ of Scrap Binding
Tools:
- Heat erasing pen
- Basic sewing supplies
Basic Instructions:
- Cut canvas & shelf gripper 20″W x 18″H. Cut canvas 20″W x 7″H for pocket.
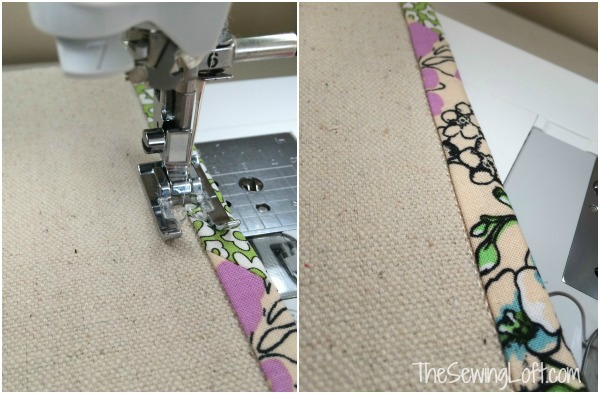
- Finish the top edge of pocket with the scrap binding.
- Layer pocket along the bottom edge of canvas mat cover and baste in place at sides.
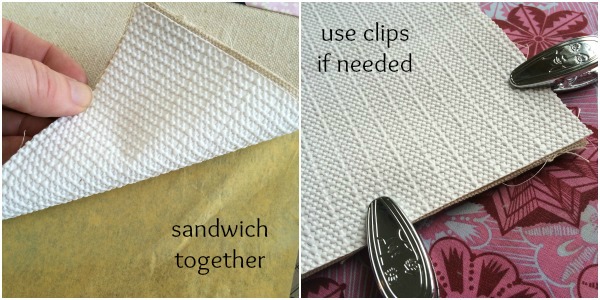
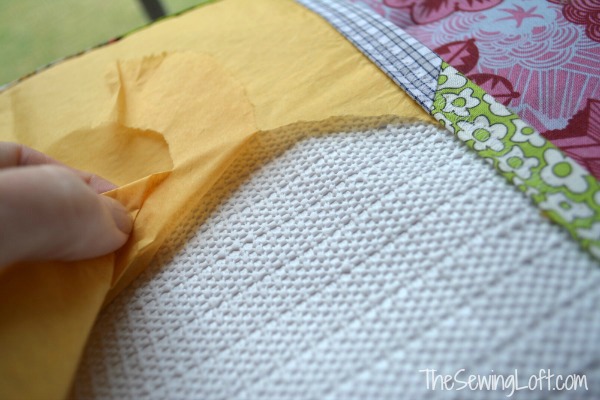
- Create a sandwich with tissue paper on the bottom, canvas on top and the gripper in the center. Basically, we want to cover the gripper with paper to make sewing a breeze.
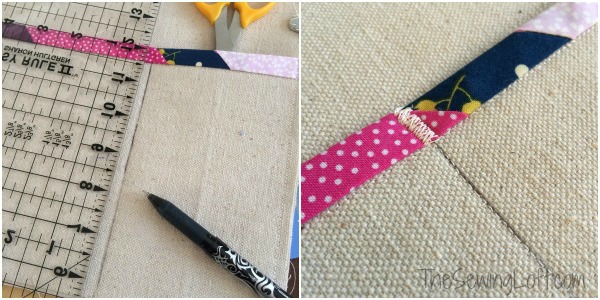
- Reduce stitch size slightly and straight stitch all around to join the three layers together. Determine and mark your pocket sizes with a heat erasing pen. Stitch in place.
- Adjust your machine set up to a small zig zag. Use this stitch to create reinforcement at the intersection of each stitch line and top pocket edge.
- Square up and trim your mat to size, attach binding and tear away the tissue paper.
After you have your sewing machine mat stitched up, I’d love to hear if you’ve ever stitched with an unconventional material. Leave me a note in the comment section below.
Hello! Are you new to The Sewing Loft?
If so, I’m glad you stopped by and hope that something has inspired you to keep your needle moving! Don’t miss a single project and subscribe via email HERE! Bonus- free embroidery pattern with newsletter sign up. Another great way to connect with me is via Facebook, Pinterest, Twitter, Google+ or Follow along with Bloglovin. I’m looking forward to getting to know you and creating together!


Comments & Reviews
Awesome!! I’ve never used a sewing machine mat because I’m afraid it would slip around – and take my machine with it;. But shelf gripper underneath would keep that from happening. I’ve got a post on Craft Gossip that links to your tutorial:
http://sewing.craftgossip.com/tutorial-non-slip-sewing-machine-mat/2015/01/12/
–Anne
This baby is not moving Anne. You should totally give it a go. Thanks for the share!
~Heather
Sure wished there were larger pics of the project all through the tutorial because I’m not quite understanding the instructions and I’ve been sewing almost 40 yrs or maybe I’m just going senile hehehe. But if you could help with a drawing or something with more elaborate instructions. I would greatly appreciate it a whole bunch. Cause I really need to make one of these but I was thinking of trying to make a smaller one with no pockets for my footpeddle that keeps running from me.Frankly I think your a genius for coming up with the idea. I wished I’d a thought to sew shelving slip to material what an idea. Thank you in advance for any help you could offer.
Hugs from an old sewer,
“Happy Crafting”
Dianne M.
Hello Dianne,
Sorry to hear that you need a few extra photos. Let me see if I can finish up my workload today and sketch something out quickly. No promises it will get done today but I’ll have something together by the end of the week.
~Heather
This is a great idea! The mat I use at the moment is a quilt I made for my daughters dolly pram over 30 years ago…so time for a change! I love the pocket idea, simp,e but effective.
Hellow Heather,,,I guess the most unusual material I have sew with a regular sewing machine would be my granddaughter trampoline..A hole started towards the middle,,ordered a patch kit..and the instructions said to sew with an industrial machine…So took out my good old Singer Standard, set up on a tv tray, had the neighbor guy to help take off the springs (no way I could have) and sewed up that patch…Worked great…Sewed up neighbor’s old Carhart coat that needed patches…Great deal and granddaughter can now safely return to jumping up and down….Love your machine mat..Been using liner under sewing machines for years…but just used painter’s tape to hold it down..Yours much cuter and has pockets too….
I am in the process of reorganizing and this idea is so much better then mine. Thank you. I use those liners but never thought to use them in this way.
I love your idea of gripper fabric and that’s a great way to sew it. I made a mat and pocket similar with three placemats I overlapped. One of the placemats I made into a large pincushion to sit next to the sewing machine. It has been one of the most useful things I have made for my sewing room because all the necessaries are right there. Love your blog!
Ann
I recently bought my first serger. My sleep cycle was turned around, so I was sleeping days. I wanted to sew at night, but the serger was so loud (I live in an apartment building.) it sounded like a helicopter. (And I, too, have it on the kitchen counter, which causes everything else on the counter to vibrate and make noise.) I decided I needed a mat, but I only got a far as cutting several layers of shelf gripper. (I chose this, because my sister’s sewing machine actually vibrated right to the edge of her table, and when she stood up the table tipped over and the sewing machine smashed on the floor into million pieces!) So, I was thinking that I needed to not only deaden the sound, but also keep the thing from walking off the edge of the counter. That baby isn’t going anywhere now, it literally sinks into the gripper, and you have to practically peal it off, to move it 🙂 The two layers of gripper help with the noise, but not nearly enough to sew in the middle of the night! So, I thought I would also add several layers of batting in the middle, and then put fabric on top. But I haven’t done it yet. I was trying to figure out if you could safely sew through that rubber gripper without damaging your needle or sewing machine. Did you have any problems with that? Did you need to use a really heavy-duty needle? Also, is there a reason why you used canvas for the top layer, instead of a decorative fabric? I was just going to use something pretty. And I also need to make a removable pocket to catch the fabric shavings from the serger. I like what you made; I like how it turned out. I hadn’t thought of using binding around the edges, but it sure seems like that will make it a whole lot easier. I was just going to sew it together inside out and turn it around like a pillowcase, but that might make for a really bulky seam. Also, that was a really smart idea to use the tissue paper! I hadn’t thought about that aspect of sewing with the gripper, but that would’ve been a nightmare without the tissue! I sure liked seeing yours all done, as it gives me a visual and the opportunity to ascertain what changes I might like to make to customize mine, for a serger. Plus, you figured out the hard part, saving me a lot of hassle. Thanks for sharing your idea and for making the tutorial. I also have to make one for my reg. sewing machine, and for that one, I probably won’t need to make changes. Thanks again, Heather! 🙂
When my sleep cycles get mixed up all I want to do is sew. It keeps me calm and takes my mind off the stress of not sleeping. I would suggest using a denim needle and maybe even a walking foot if you are planning to use that many layers. Since the gripper was sandwiched between the fabric and tissue paper it never touched the machine and was perfect for sewing on. (no machine damage or stress on my end.)
There was no special reason for using the canvas other that I am in a use what you have funk and there was a bug chunk of it left over from another project on my desk. A new machine cover…. that will be posted soon.
Keep me updated on your mat. I love the idea of customizing it for your workspace.
~Heather
Thanks, Heather. I guess I was just worried about whether the needle could go through that rubber grippy stuff without jamming or getting stuck.
I can’t wait to see your machine cover, because they’re on my “To Do” list, as well.
Susan you could try putting a thicker mat under the table that your sewing machine is on. That will cut down the noise and vibration.
Yay. Great idea & even better tutorial. Everyone I know will be getting one of these, eventually, this year. I might add whether they sew or not.Just kidding
GREAT idea for using the tissue paper to get the gripper mat to go through the feed dogs!
I have been using the shelf gripper under all of my machines for some time now but never thought to make such a neat sewing mat with the gripper attached like you did. What an awesome idea. And the pockets in front can be used not only for sewing supplies but how about thread clippings and scrap fabric that you clip. Would work extremely well for a Serger too. Wonderful project – cannot wait to make one for each of my machines.
Thank you Toni. I would love to see what your mat looks like when done.
~Heather
Just made this…I love it!!
Love this idea, I’ve been wanting to make something to keep all my tools and the mess of my working space and this just makes sense and seems easy to do….. I just recently purchase the same sewing machine and I love it. 🙂 thanks for sharing this cool tutorial.
Ale
Heather I love this tutorial and can’t wait to make it. Question. Your binding looks al beautiful machine stitched. What is your secret. It is my worst area aside from free motion and would love to grt better.
No big secret Jodi other than I’m a complete cheater. I tend to cut all of my binding between 2 1/2-3″ wide and because I’m a total fabric hoarder I tend to cut it on the straight unless the edge is curved or I want to use a stripe as a design element. Then I stitch it about 3/8″ from the edge, stopping 1/2″ from the corner, folding my fabric to create the corner and repeat. Once that is done, I just flip it over, press and stitch. I think pressing is the most important part. Plus, the seam allowance of the fabric totally keeps it looking full and pretty. I hope that helps!
~Heather
Great idea, thanks for sharing! I am away on holiday and will make one when I return home.
I often use cheap plastic placemats as the bottoms of purses/bags to give them more structure. I encase them in a fabric envelope that matches the bottom of the bag.
Do you have a brand for your shelf gripper – I’m in the UK and can’t find it – or are there any other suggestions for what I could use? I’d love to try this!
Hello Karen,
I picked my gripper up at the local hardware store while shopping with Mr. TSL. It made by Easy Liner and is distributed by Shurtech Brands, LLC but I have also worked with gripper that I picked up at the dollar store. I think they are pretty much all the same. I hope that helps!
~Heather
Thanks Heather, I’ll check it out! 🙂
Going to make this been scorcing supplies! Karen I’m in UK and see that Lakeland sell shelf grip. Looks similar too. Cant wait to make this.Thanks for a great tutorial x
1
Thanks Joy, I’ll check it out next time I’m near Lakeland. 🙂
I love this mat! I have made a lovely one with pockets and pin cushion but it slips! Never thought of shelf gripper and as I am in UK am grateful to Joy above who says Lakeland sell it.
Awesome, I love to hear that Joy’s comment was helpful! Keep me posted on your sewing mat project.
~Heather
All I can say is “Awesome!!!” I have my grandmother’s wood table that works perfect for my sewing area, but I worry I about scratching the top. This not only will keep my sewing machine from moving, but at the same time protects my table.
Yay! So glad to hear it will work for you.
My only concern, grip mat has left a dot pattern on one surface, of a table, I used it under a cutting mat. So be forewarned, the grip mat is not compatible with all wood finishes!
Interesting Sylvia. My machine tends to move around. One table is wood and another is from Ikea with lament.
Made this today ! Used cheep but narrow Dollar Tree shelf-grip stuff, had to sew two pieces of it together, then I couldn’t find my tissue paper, so I used fast-food napkins, and I forgot I had little experience with bias tape… but it came out OK ! Finally, a place for the cable remote ! And my favorite ruler. Thanks for the tutorial !
That is awesome Dorrie! So glad to hear that your “make it work” moment paid off with the napkins.
~Heather
This is brilliant, pretty, functional & so professional looking! Thanks so much for sharing Heather! I’ve been using the shelf liner alone, but this is way better! I love the clean look of the canvas & your pretty binding. Need to make one of these soon.
My quick fix, before I read about the pretty protector, is a rubber placemat from the Dollar Tree. I use the wrong side so it is plain. Does not move! But, when I want to slide my machine to a new position, just grab the mat and it will move machine easily. I do love what you have done.
I made one with a double pocket. My major problem now, I over load the pockets they are sew handy. The back one is full length of mat, and the second one is the sizes I need, They can be customized ie. for 45 inch rulers,, stay fray, pencils, the back one for rulers etc. I love it. PS, before your blog I used the no slip shelf material. It really helps, bonus—you can fold up the mat and take it to class or guild.
Thanks for the note Stephanie. It sounds like your set up is sweet!
-Heather
Hi Ive read all the comments as Ive been wanting to make one of these for ages. the not slip shelf grip stuff I got from IKEA for those Brits who are wondering . I think it would be the cheapest option.
I can’t wait to make this as I have been wanting to make a mat for my Sewing Machine. Thank you so much for sharing your pattern.
I have used Cork Fabric several times to make Purses and Wallets. It is wonderful to sew with.