Valentine’s Day is one of the sweetest holiday’s around and today, I am sharing how to make candy filled love letters.
My girls love to pass out special treats to friends on Valentine’s Day and to be fair, I think that it’s expected since Valentine is their last name. (I mean… come on people!)
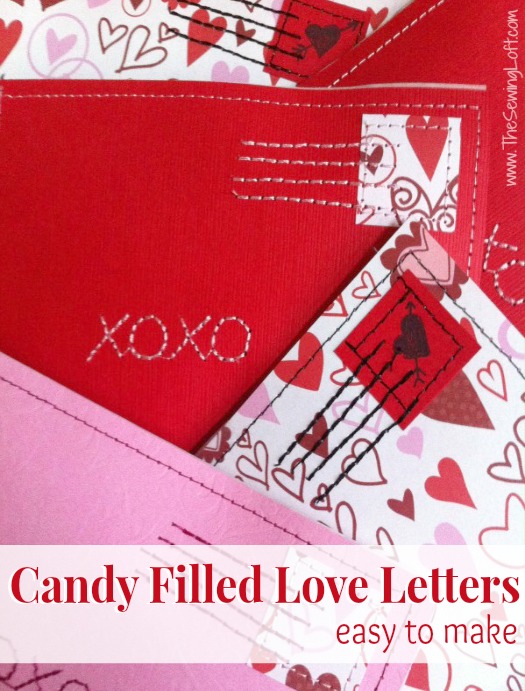
Love Letters
This project is for all levels.
Skill Level- 1 Button

Materials:
- solid & printed paper
- candy
- parchment paper
**Be sure to check out my Paper Sewing Tips if you have never sewing on paper before.
Basic Instructions:
- To form your letters, cut paper and parchment into 4″ x 5.5″ rectangles.
- To create stamps, cut paper of choice into 1″ x 1″.
- Position your stamp in the upper right hand corner and all around edge stitch.
- Stitch some fun squiggly lines to represent the cancelled postage. You can draw these lines with a pencil 1st and then stitch over them.
- With your machine or marker, add some fun words to the letter. (See below for cute ideas.)
- Match up your letter with parchment paper, wrong sides together and straight stitch around 3 sides. This will form a “pocket”. Fill the pocket with small candy. Be careful- overfilling will make the pocket hard to close.
- Stitch up the last side, trim any loose threads and you are set!

Cute ideas:
Romeo
Sweet Thing
Cutie Pie
Hugs
Heart Throb
Heart Breaker
Super Sweet right?! Just love them!!
This project first appeared on Cool2Craft TV .
Happy Crafting!
Hello! Are you new to The Sewing Loft?
If so, I’m glad you stopped by and hope that something has inspired you to keep your needle moving! Don’t miss a single project and subscribe via email HERE! Bonus- free embroidery pattern with newsletter sign up. Another great way to connect with me is via Facebook, Pinterest, Twitter, Google + or Follow my blog with Bloglovin. I’m looking forward to getting to know you and creating together!

Comments & Reviews
What a cute idea! I finally got a sewing machine this last Christmas, so I’m always looking for things to try! I found your blog from “Freaky Friday Follows”
Thanks! Pull that machine out and let’s get stitching!!
~Heather
These are SEW sweet. Such pretty Valentine-y colors!! Would be delighted for you to link up to Mop It Up Mondays: http://www.ishouldbemoppingthefloor.com/2012/02/mop-it-up-mondays-party-2.html
{HUGS},
kristi
These are soo stinkin adorable.. and they look like something my sewing challenged skills could handle! I would love, love, love if you would share with my Pink hippo party @ http://pinkapotamus.blogspot.com/2012/02/pink-hippo-party-66.html
Very cute! I love it when Valentines are hand made and so personal. Thanks for sharing this with us!
Sew cute !! I have always loved handmade Valentines.
Come over and see some real love letters….:)
xo bj
Just watched the video, Heather… Love it!! Great job! And that candy love letter holder is perfect!
Thanks for watching Lindsay! My girls are getting them tucked into their backpacks!
What a cute little idea! They look fabulous!
Thanks for linking to a Round Tuit!
Hope you have a fabulous week!
Jill @ Creating my way to Success
http://www.jembellish.blogspot.com/
Those are so super cute. Love it.
Thanks for linking up at Giggles, Glitz & Glam.
These are adorable!!! Sewing on paper – sounds easy. I watched your video – awesome job! You are sew creative. I love seeing what you link up each week!
Thanks for sharing on the Take it on Tuesday blog hop! I’m pinning this!
What a fantastic idea! Totally making this for the kids 🙂
Thank you! I would love to see them..
This is too cute!
~Mrs. Delightful
ourdelightfulhome.blogspot.com
What a lovely last name – and a great project too
Oh those are so sweet and cute!
~hugs
I love this idea! How adorable! 🙂
Absolutely love this idea! How fun! I’m your newest follower and I’m pinning this lovely idea to Pinterest!
Blushing!
Love the Love Letters! I’d love for you to submit this to the M&T Spotlight http://www.makeandtakes.com/spotlight
Love this, I just noticed you were in ‘Green Child’-good for you!
Thanks so much for taking part in our Pin’Inspiration Party. Hope that you are having as much fun exploring as I am and that you’ll take part in helping the “Beat the Winter Blues” on Saturday.
So cute, I love finding any new way to use my sewing machines since I love to sew! What a great unique idea, thanks for showing us how. Thanks for sharing you creative inspiration at Sunday’s Best. PS – now following you on Facebook. Love to sew!
So cute! I love it! Thank you for linking up to A Pinteresting Party!
What a wonderful idea! I love it. I’m your newest follower. I would like to invite you to share at our sharing party at http://craftymomsshare.blogspot.com/2012/02/sharing-saturday-6.html. Thank you!
Super cute! I need a sewing machine ASAP 🙂 Thanks for sharing at Taking A Timeout Thursday!
I loved this project so much, I featured it on today’s Take it on Tuesday blog hop!
You’re being featured tonight at Taking A Timeout Thursday! Thanks so much for sharing!
wow..i love this..i want to try this out..
Thank You for the Valentines project, very cute!
Que bella idea! la voy a poner en práctica. Muchas gracias por el tutorial. Un abrazo desde Venezuela!
HOLA hEATHER!!!!!! HE VISTO TUS VIDEOS Y ME RESULTARON FACILES Y MUY ENTRETENIDOS , GRACIAS POR SUBIRLOS, SALUDOS DESDE ARGENTINA, Y A COSER!!!!!!!!!!
You are most welcome!!
~Heather
I couldn’t find this tutorial or the video again after I saw this cute craft! So, I ventured out on my own. They turned out great! I used a heart decorative border, Valentine fabric for the stamp, and Valentine fabric behind the card so it could be seen through the velum.
Thanks for this great Valentine idea. I’m sure the grand kids will love them!