Or at least that’s what Becky calls her “wooden iron”! Please welcome Becky from Patchwork Posse, sharing her favorite tool in the work-room.
Wooden Stick that is!

I am not one to use an iron…..if you have sewn with me before you totally know that I don’t iron much. It just takes too much time…but, ironing is important when you are paper piecing.
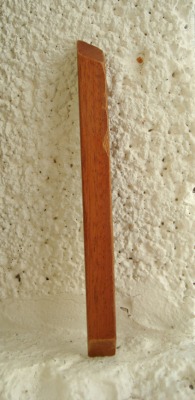
That being said, i don’t use a traditional iron when i’m paper piecing. I use a little stick. Yup, a wooden one that has an angle at the ends that are used for pressing the fabric.
I am not sure why this wooden iron works, but it does and i love to use it! Besides the pressing, it makes it so you can have all your fabric pieces around you and the sewing machine and never get up off the chair when you are sewing the block together! You sew, use the wooden iron, sew again…..wooden iron. Repeat, repeat. Block done.
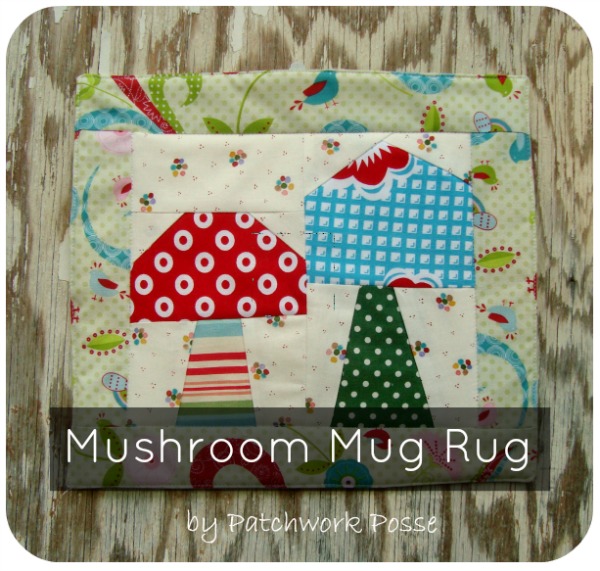
With this cute little piece of wood i thought that i would show how to use it + share a quick pattern- Mushroom Mug Rug
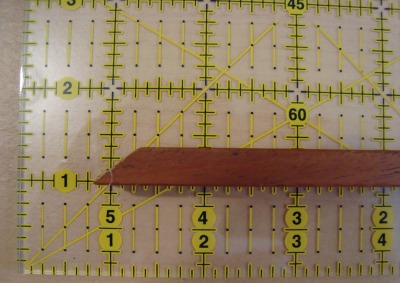
Before we get started let’s talk about the piece of wood first. It isn’t long….6″ at each end the wood is cut at an angle. Mine is cut at a 45′ angle. This is the side i use the most. The other end is cut at more of an angle, around 60′ or so. The photo below shows how the angle sits just a little flatter on one end.
I think the preference is up to you and how you hold the wooden iron. There are 2 options.
These were made by a gal in my sewing group, if you have a wood guy around they are really super easy to cut, sand and stain. Or you can find them in sewing shops around town.
Let’s get to the pattern shall we?!
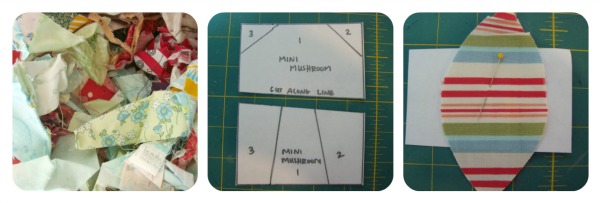
This project is perfect for your scraps bag. Snatch up some fabric scraps and print off the pattern. You will be sewing 1 mushroom of each kind. So one copy is just fine.
Understand that this paper piecing pattern DOES NOT include the 1/4″ seam allowance. The only time you need to worry about that is at the end when you are trimming your whole block, but just be aware.
Grab your scraps and your paper and let’s get going!
After you have cut out your template, lay the chosen fabric for the mushroom stem on the bottom of the pattern. Notice that the right side is facing away from the paper. I have pinned this piece– it always shifts when you turn it to sew…so pin it! {a flat pin will work the best}
You will need to make sure that your piece is at least 1/4″ larger than the template it is for….remember, the seam allowance is not given. The lines that you see on the template are your SEWING LINES!! So, you will need your fabric to go past this 1/4″ so you won’t get holes in your mushrooms later.
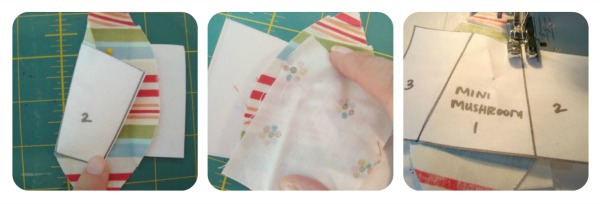
With the paper on the bottom and the fabric on the top, fold back one edge until you line up the black line with the edge- Use your wooden pressure here to get a good crease.
Open the paper and fabric up- you will notice that there is a crease in the fabric. If you can’t see it well enough, refold and repress with the wooden pressure.
Place your next piece right side down on top…..let this piece go past the crease 1/4″ for your seam allowance.
Pinch with your fingers or pin in place, then turn so the paper is now on top– showing your sewing lines.
Sew on the lines with your sewing machine. * backstitch at both ends- this will help the seam stay when you are removing the paper later.
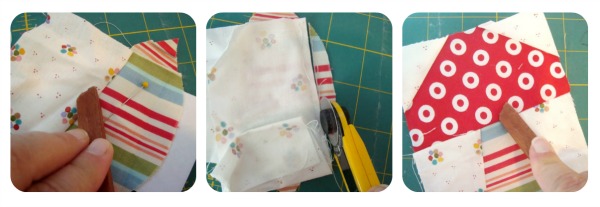
Open up the fabric that you have just sewn and using your wooden iron, give it a good press.
Fold back the fabric and the paper {you don’t want to cut it!} and trim any extra fabric that is past the seam. If you don’t, it will make the block bulky and if there is a lighter color on top the other seam will show through!
Repeat the same process with the other side.
Repeat the same process with the top of the mushroom. It really is like sewing by number. lol Make sure you use your wooden iron with each step and it will keep your seams nice and no puckers in the folds!
Place the block right sides facing down, paper on top. Trim your block using the paper as a guide. Cut 1/4″ past the outside edge {remember this is your seam allowance!}
Sew the top of the mushroom to the bottom of the mushroom, making one complete mushroom block.
Repeat with the second mushroom block.
Sew the blocks together, side by side. Trim to 8 1/2″ X 7 1/2″
Cut 4 strips for the border
2– 2″ X 7 1/2″
2– 2″ X 11 1/2″
Sew the borders to the sides and top and bottom
Trim to 10 1/2″ X 11 1/2″
Cut back and batting same size.
Sew all the way around leaving a 3″ opening for turning.
Trim corners and turn right sides out. Iron {with a real hot one this time}
Sew 1/8″ all the way around –closing the opening used for turning. Sew again just inside the border
Load it and snack away!
A big “Thank You” to Becky for sharing this fun tool and project today! Who knew that a simple piece of wood could save us so much time!? To learn more about Becky, stop by and visit her at Patchwork Posse Blog or enjoy her latest sewing adventures in The Sewing Cottage Magazine. (ps- you just might “spy” this magazine in the prize package! hint, hint!)
Tomorrows line up: Jenelle from TrashN2Tees will be sharing a fun project made with “Reclaimed” tees. Can not wait!!



Comments & Reviews
That’s incredible! A wood stick iron! What a lovely project, Becky!!
Who would have thunk it?? Love the use of the wooden stick, and will certainly try to find one. Thank you for the idea!
What a great little tool. I hate taking the time to iron when I am paper piecing but it is a necessary evil in order to have everything lay flat.
After reading the instructions I feel like I should be confused and I’m not!lol What a great tool for all us short-cutter, love it!
You didn’t give the thickness of the stick, you said it is 6″ long, how wide? How deep?
I’m not sure exactly how wide Becky’s stick is but I’m guessing about a 1-2″ wide piece would work.
-Heather
Thanks for all_where can I buy so a wooden stick?
I have not actually seen the wooden stick for sale Marie-Louise. I believe it is more of a DIY project.
~Heather
You can also buy a notion called a bone tool or bone turner.