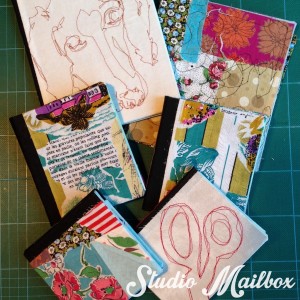
As a mixed media artist I have been keeping journals for nine years now. That’s right. When I look back at my first consistent “official” journal I started waaaaay back in 2006. So over the years I’ve managed to amass quite a pile of books. Over time, as I explored book arts, I realized that making the books themselves was just as much fun as creating the content inside them!
Most handmade books are made with a special material called book cloth. Book cloth is beautiful but it’s very expensive. What makes it special is that there is a barrier on the backside of the cloth that prevents glue from oozing through when you glue it to your book covers.
I started wondering why the heck we can’t figure out a way to create a barrier on the backside of any fabric in order to be able to coat it in glue. It turns out I wasn’t the first one to wonder about this. There are a few ways to do it. For this project, because it was all about scraps I used what I had on hand. Sure enough I had a big pile of Pellon Fusible Featherweight left over from last years’ T-Shirt Quilt.
I also had chunks of French fabric I had left over from pillow covers, some thin white fabric, some vintage fabric that was faded in spots as well as a patchwork block that I didn’t particularly like and knew I wasn’t going to use for anything. And let me tell you this is the perfect project for vintage fabric that you’re concerned isn’t durable enough to be turned into a garment.
It starts out with book board covers cut to the size you want your finished book, enough scrap fabric (backed with fusible web) to cover those covers, as well as a scrap for the spine. (I had book cloth scraps on hand so I used store bought book cloth for my spines).
Then you make a few marks on that spine scrap where you’ll glue your book covers, and then you’ll fold over the top and bottom edges.
Next you make some marks on the cloth you’ll be using to wrap your covers with. See those little pencil mark in the corners? That helps you when you go to lay the board down onto the glued fabric.
Once you have the flat front sides of the covers adhered to the boards you start with the backsides. Get them corners tacked down before you bring the longer sides in. The fusible web did not prevent the glue from oozing out in a few spots. I just wiped it away with my fingers. I dried my book covers under a heavy weight. I layered wax paper between them to prevent any oozing from sticking to the weight.

Of course your journal is going to need some pages.
Fold stacks of paper into signatures. At this point I made a jig with three spots to punch holes through those signatures. One hole in the middle and then holes about a half an inch from the top and bottom of the pages. Then I laid my jig inside the signatures and made marks where I went and punched holes with an awl. This way every signature was punched in the same spot and ends up looking more consistent than if you just make three holes anyplace.

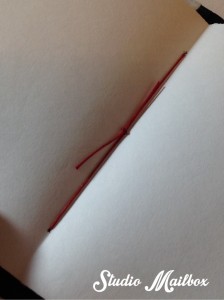
I sewed the signatures in the simplest and easiest way I knew how. Using waxed thread I started from the inside of the signature in the middle hole and punched through to the outside. Leave enough of a tail to make a knot when we’re done. Now you can go either up or down it doesn’t matter. I always go to the left for some reason. So I came back in at the bottom of the signature. Now you are inside those pages again. Skip over the middle hole where your thread tail is hanging and jump to the top hole and punch back through to the outside. Waxed thread can be sticky. Be gentle when you pull it tight, it can cut through paper like butter if you’re not careful. Now your needle is on the outside of the spine again. Come back in that middle hole where you started. Be careful not to split the thread that’s already in there. Now you are back inside those pages. Remove your needle, tighten up the thread and tie it off. Do this for all your signatures. Voila!
I am so happy with how my unloved patchwork block looks as a book cover. I also took the time to practice some free motion stitching on those white boring scraps. Another style was to take the tiniest of scraps, place them on the pellon to be ironed and then free motioned them down. I thought that was a cool way to use pieces so small they’d be pretty hard to use in other projects. The possibilities are endless. They say you can’t judge a book by it’s cover but I’d beg to differ!


Comments & Reviews
Nice job. You make it look so easy. What a great way to personalize a bookcase full of books.