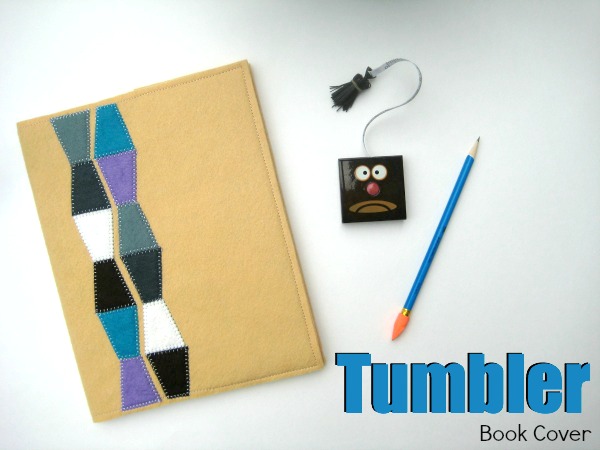
Last month we chatted about EPP (English Paper Piecing) & Hexies but today, I wanted to share another easy shape to create with this technique. The Tumbler.  The tumbler is considered a classic shape that is known for its straight lines. Mix tumblers together to with hexagons to create playful patterns. Today, we are going to use this shape to make a snazzy new book cover for my sketch pad.
Tumbler Book Cover
This project is for all levels.
Skill Level- 1 Button
 Materials:
- 2 pieces of 12″ x 18″ felt
- notebook
- assorted felt
- embroidery thread
- tumbler template
Tools:
- iron/ironing board
- sewing machine
- frixion pen
- lapel stick
Basic Instructions:
- Print out the tumbler template on freezer paper and cut out.
- Measure your notebook height and then open it up and measure from end to end. Add 1/2″ for seam allowance to both numbers. My notebook measures 9 3/4″ h x 15″ w and my cut piece of felt is 10 1/4″ h x 15 1/2″ wide. This gives me a small 1/4″ seam allowance all around.
- To keep my pattern straight, I marked a vertical line with a heat erasing pen. Position tumblers in desired pattern and add a dab of glue to keep in place while stitching.
- Select an embroidery stitch and all around stitch. I like to work one row at a time. It is important to take your time when stitching. These stitches will be a visible detail on the cover of your book.
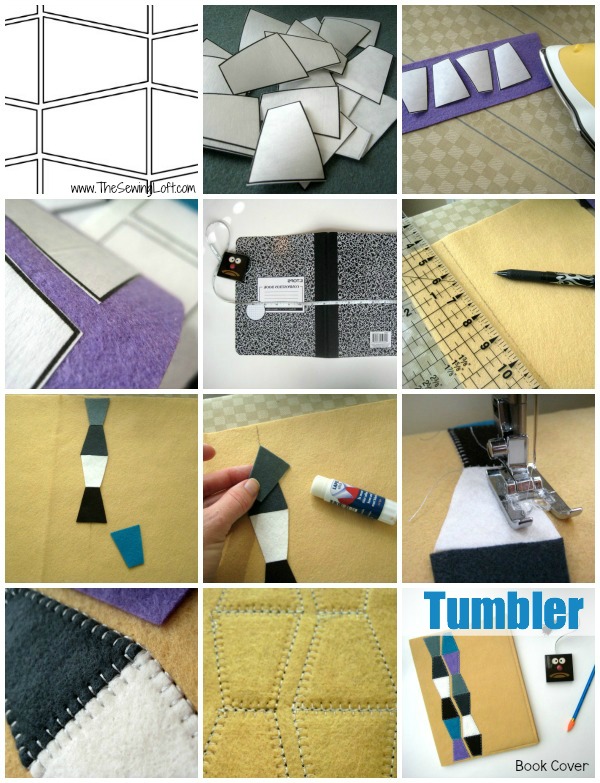 Now, to finish this book cover off, see the basic book cover post for the remaining instructions.
The material for this post was provided by National NonWovens. I adore their felt and ever-expanding color palette!

Hello! Are you new to The Sewing Loft? If so, I’m glad you stopped by and hope that something has inspired you to keep your needle moving! Don’t miss a single project and subscribe via email HERE! Bonus- free embroidery pattern with newsletter sign up. Another great way to connect with me is via Facebook, Pinterest, Twitter , Google + or Follow my blog with Bloglovin. I’m looking forward to getting to know you and creating together!

Comments & Reviews
Super cute. What a fun and simple detail to add. It gives a very neat look.
With Love,
Al @ Shaffer Sisters
I am in love with this! I haven’t used tumblers before, but I’m a big fan of hexis and other small pieces. I can’t wait to try this with felt!
I’m really loving the shape too!