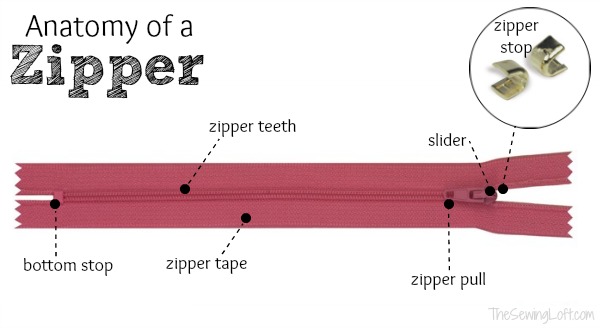
Sometimes, it is hard to find the exact zipper needed in your for a project. So, I thought it would be fun to share an easy trick for reducing zippers and adding zipper tabs. But first, let’s explore the anatomy of a nylon zipper. 
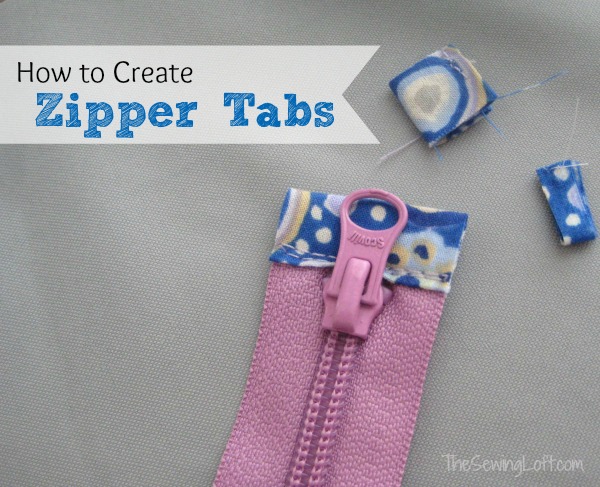
How to Create Zipper Tabs
This project is for all levels.
Skill Level- 1 Button
Supplies:
- zipper
- 2 1/2″ x 4″ rectangle of woven fabric
Tools:
- sewing machine
- pins
- scissors
- iron and ironing board
Basic Instructions:
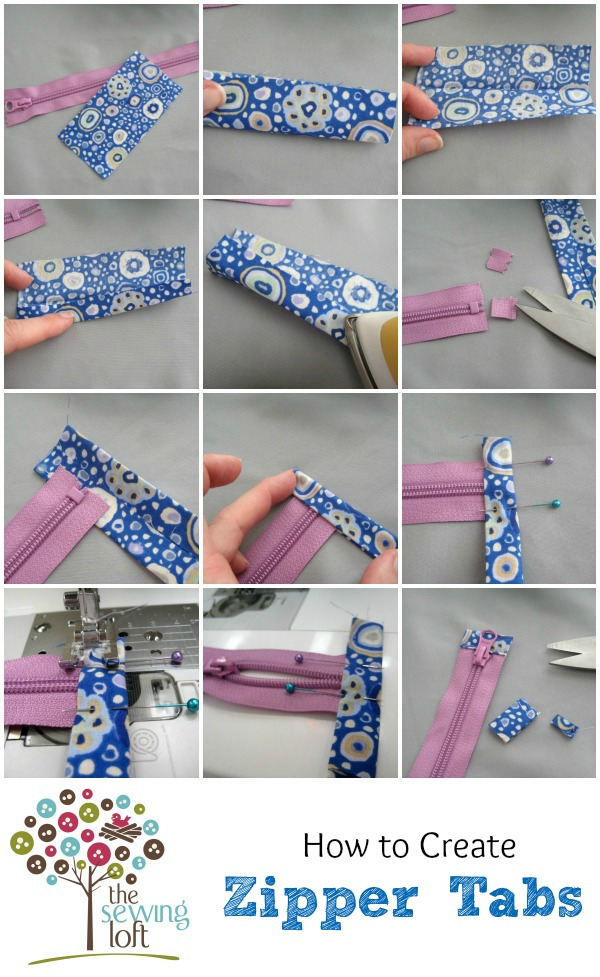
- Fold and press fabric rectangle in half lengthwise to expose the “pretty” side of fabric.
- Open it back up and fold each side to the center; press.
- Trim the ends of the zipper tail to just below the “stopper”. *Note do not cut off the bottom stopper!
- Slip the zipper end in between the folded fabric to create a sandwich. Pin in place.
- Straight stitch along the edge. Trim off ends of fabric from zipper tab.
- Open zipper slightly and repeat steps 3 & 4. Be sure to line up the zipper straight across the top opening before attaching the zipper tab.
Additional Notes:
- Go SLOW when stitching over the coil part of zipper. If the needle hits the zipper coil too fast it could snap and break.
- Consider stitching the fabric twice for security.
Zipper tabs are the perfect little detail for small pouches. Sometimes, even if the zipper is the right size, I will make it smaller just to add the tabs. I just love the added punch of color! Interested in putting your new sewing skill to the test? Then you won’t want to miss my zipper pouch round-up. This round-up includes some of the cutest free tutorials on the web.

Hello! Are you new here?
Do you want to learn more about sewing? If so, be sure to sign up for our newsletter HERE and never miss a stitch! Daily Sewing Tips, Everyday Projects and Fantastic Inspiration delivered straight to your mailbox!
Bonus– free download with newsletter sign up.
Feel free to connect with me on Facebook, Pinterest, or Instagram. I look forward to getting to know you and stitching up a storm!


Comments & Reviews
Great tutorial! How is it that zippers in our stash are rarely the right size? I’ve linked to your tutorial on Craft Gossip:
http://sewing.craftgossip.com/tutorial-finish-zipper-ends-with-zipper-tabs/2013/10/15/
–Anne
thanks…great instructions
i have made hundreds of fabric zippered pouches for charity and this is exactly how i finish my zipper ends. Makes everything look very tidy and gives the pouch an upscale boutique look!
Hi, I need to put in a zipper in hubby’s casual knit pants. The front fly type.
He is in a wheelchair, can’t stand up. I do alot of sewing, but putting in a front fly like regular
mens slacks not knit, I don’t know how to do it. need some help
Please help
Thank you,
Ruth
This simple trick is great.
great info. Can hardly wait to try it
how to sew perfectly the three corner of the the bag on the edge of the geset
Once the pouch is finished, are these zipper tabs on the inside or outside of the pouch? I really appreciate the help!
Hello Jana,
Thanks for the note. The answer to your question is really it’s up to the maker. Since the outer edge is folded, the maker can leave the zipper long and omit attaching it to the seam allowance.
Can’t wait to see what you create with your next set of zipper tabs!
-Heather